Friends of Happy Wen!

Showing posts with label wendy bickford. Show all posts

Friday, April 15, 2016

Full Steam Ahead

A few weeks ago I won a My Bestie challenge and this image was my choice from Sherri Baldy. You can shop this image with this link --->, img085 Steampunk Fluffy from Sherri's new Fluffy Bestie series. I LOVE HER! 

Boy was she ever fun to color up with my copics.
These are the colors I used for her skin tones.
And these are the colors I used for her leather and metals.
Lastly, these are the colors I used for her clothes and hat. To make sure her little tulle skirt showed up, I used only the lightest colors in the skirt area to make it more translucent.
And I got to stash dive through all of my embellishments that fit the steampunk theme - yes my workspace is always a hot mess (LOL). I couldn't find just the "right" paper to compliment this awesome image, so I made my own in photoshop! I printed out my main paper a few times and then worked the magic with my cuttlebug, Tim Holtz embossing folder and sizzix dies, lining the elements up to the foundation paper - I love that look. Found the perfect ribbon, metals and bling for the theme and cut out a bunch of circles and flowers with my nestabilites, chalking all the edges for definition when layering.

Challenges: My Besties Dutch Girls Challenge-AG with a My Besties Fluffy; My Besties France - Challenge 50 AG; My Bestie Spanish Challenge Blog - AG optional Tag;  My Besties UK Challenge Blog - AG/pink; My Bestie German Challenge Blog - AG/birthday


Sunday, April 3, 2016

Say a little prayer

I found the perfect image from Sherri Baldy, img871 Say A Little Prayer Girl from Sherri's My Bestie Series.
I colored her up with my copics using a different combination for her skin color - I love how it turned out. 
I also did a fancy fold for this card. As a special gift for this card, I made a little corner bookmark for the recipient to mark her scriptures, which she reads daily. I of course used my cuttlebug for my die cuts and some dotty, wordy and stripe papers. The lovely dotted organza ribbon bow holds the card shut, easily lifting the right side of the bow to open the card, revealing the corner bookmark.


Until next time, remember to play and craft daily!


Sunday, March 13, 2016

Digital cardmaking

Digital cardmaking... Since hubs and I are living the full-time RV lifestyle (totally awesome!), I've had to pare down my supplies and go digital as much as possible. So with many yard sales and giving up my beloved diecutting machines, I not only needed to find cute images to color with my Copic markers, but the need to find printable paper and elements has become a necessity if I want to continue one of my favorite hobbies - cardmaking. When searching Google and Pinterest for my necessities, I was overwhelmed with the selection. I did keep my little HP 385 photo printer, enabling me to print 4x6 sizes - PERFECT for my needs.

Without further ado, let's chat about the greeting card I created today, shall we?!?

The ding-dang-darling image is img831 from Sherri Baldy just one of many in her My Besties series.
I knew I wanted to find some papers and embellishment elements with the sewing theme and I so love all things vintage and shabby chic; this awesome set fit the bill 100%!  Vintage Sewing printable papers from issue 147  free from PaperCraft Inspirations Magazine! 

Matching my Copic Marker colors to my paper - the image was so much fun to color!
Copic Recipe:
Skin - RV0000, 000, 00, E0000, 000
Hair - E41, 42, 43, 44
Shirt/buttons/thread (pink) - RV00, 13, 21
Pants/button/thread (green) - BG10, 13, 15, 23
Buttons/thread (peachy) - R000, 13, 20, 32
Buttons/thread (blue) - B0000, 00, 02, 04
Needle - C00, 02

I laid out my design, picked out my silk ribbon, using a circle punch, my Martha Stewart corner punch with the "sewing" holes to use on my inside insert corners, and used a pushpin and my tiny mouse pad to "sew" the edge of my image and then distressed it a bit with some small tears and edge rolling. I do have a pair of very sharp small scissors to cut out the elements - you could also use an X-Acto knife.


And here is my completed card - "Sew Glad We're Friends!"

Thanks for stopping by - while you're here don't forget to follow my blog and even securely sign up for emails of my posts :) 

Have a spectacular "Sew Glad We're Friends" kinda Day!


Friday, March 4, 2016

Bestie Tales

I saw the cutest image from Sherri Baldy Img697 that I just HAD to have. I knew immediately what I wanted to do with it, so I gathered my supplies and set to work.

Knowing I wanted to emulate a book with the front of my card, I found this great YouTube tutorial from Christina Griffiths-Faux Book Card. I also knew I wanted to make a corner bookmark and followed this tutorial from Jenny at Stamping Moments. 

I also love to 3d images on my card fronts and have followed the wonderful tutorial from

Adding my Tim Holtz weathered clock die cut, weathering it a bit with Tim's Distress Ink-black soot. The project required some fun stash diving for paper, buttons, ribbons, brads and a clock charm; all of which helped me pull it all together. I wrote a little "book sentiment" as the insert for my intended bestie recipient, which I think she'll get a kick out of.


Of course I colored the images with my beloved copics and added some Ranger liquid pearls and a few dabs of Zig's Wink of Stella.
Copic Recipe:
Skin - R0000, 000, 01, 20
Hair - C00, 2, 4, 6, 8
Pants/Bow - R81, 83, 85

Thanks for stopping by!


Monday, August 12, 2013

Giveaway from HodgePodge Crochet

HodgePodge Crochet is having a wonderful Giveaway for reaching 6,000 fans on Facebook! There are over 100 vendors participating with some really amazing prizes. Go to HodgePodge Crochet and click on the BLUE GIVEAWAY button - then like and enter any or all!

Here is my prize - Two winners will receive a $20.00 discount to my shops here and here. Like I said, there are over 100 vendors participating with all kinds of wonderful prizes! Come join in the fun, enter to win, like and share, share, share! :) Good luck to all!

Tuesday, April 23, 2013

Crochet Chef's Hat with Mustache!

Just off the hook! Whipped up this little Chef's Hat for Axton...he loves to play kitchen and cooks up some devilish delights. Don't you just LOVE the Mustache - I do!
Happy Hooking!
Love,
Wendy

Cupcake Purse Crochet

Oh, my goodness... this was soooo fun to make for Miss B. A cupcake purse! The pattern is by Tapanga and is just the perfect size for a 5-1/2 year-old... 5" in diameter and 7.5" tall. I used little heart plastic beads, crocheted into the "frosting" for confetti. The project is hooked with Lily Sugar n' Cream cotton, in white, brown and their hot colors.
Wishing you a Cupcake Day!
Love,
Wendy

Sunday, April 21, 2013

A bit of Crochet and a tale

It's been a long time since I've posted! I have been overwhelmingly busy, to say the least. I've had a few opportunities to scrap and make some cards, but lately I've gotten the "hooker" ;) bug again. In October 2012, we became full-time RVr's and are loving our lifestyle. We traveled to Utah, Colorado and Arizona, before returning back to the NorCal area in mid-December, visiting family and dear friends.

In January the gkiddo baby boom began with the sweet arrival of baby Allison Lorraine, weighing in at a whopping 10 lbs! She is just as sweet as they come!

In February we welcomed our precious baby Jackson Charles, weighing in at 7.15 lbs, and blessed that he is "perfect" in every way!

Last, but not least, for the year in March is our dear baby Jonathan Thomas, weighing in at 9.15 lbs. He's just darling!
 
As I said, I've been hooking again. Both of my dear grandmother's, when I was a child, taught me the art of crochet. I had put it down for years, mainly scrapbooking and cardmaking. However, with the babies, I've returned to my old "habit" and am thoroughly enjoying it! Here's a couple of projects I've completed recently for the newest gkiddos.
 
For Jonathan, his mommy showed me a "cocoon", so decided I would make one for him, along with matching hat, blankie and booties. I learned a few new stitches with this set, and was thrilled with the outcome. Blanket, hat and cocoon were mods of many patterns and ultimately my own designs, but the Roll-Top botties pattern by Hayley Missingham can be found here
 
For baby Allison, I just finished this watermelon set. The little white dress pattern is by Sarah Cooper. The diaper cover pattern is by Elizabeth Alan. The flip-flops were a bit fiddly, but finally figured them out via posts on Pinterest. The headband is my version (watermelon) of Genevive Hunter's headband. I was inspired to make this set by Ellen at wilDaBoUtCoLoR  - she is soooo clever!
And the backside with "seeds" :)
Wishing you a wonderful Day!
love,
Wendy
 

Monday, July 9, 2012

Prima Ballarina, Brooklyn!

It's time for my DT project for Seems A Little Sketchy, Sketch 17! This time we are sponsored by AiFactory and I have chosen Ella the Ballerina. Sketch 17 is just perfect for my project!
This sweet little image just grabbed me and pulled me in so much, that I chose to use her six times!
My precious 4 year-old granddaughter, Brooklyn, has her first ballet recital this weekend and this card is perfect for the occasion. I wanted to simulate Brooklyn as the Prima Ballerina with her ballet troupe, all colored up with Copic markers.
I was chatting with my dear friend KathyCan and discussed the project with her, adding that I wanted to make it appear as a stage when you open the card. Well... Kathy had done a stage pop-up card back in November for her daughter, Allison's, birthday. Allison is a big Alice in Wonderland fan, so Kathy ran with that theme for her card - you must check out Kathy's wonderful project here. She turned me onto a fabulous tutorial by Kim (Paper Punch Addiction). Kim's tutorial worked perfectly for this project to put Brooklyn on stage in the spotlight!
Kathy sent me a birthday box full of My Mind's Eye 6x6 pads, and "indie chic" is perfect for Brooky's card. Used my new Memory Box "Elegant Scrollwork" to simulate "motion", which I found at Oozak. Wanted to give a feel for stage lighting, so used buttons, pearls and black tulle for the job on the card front. Inside wanted to use the star jewels/rhinestones, and the DP worked great to simulate the stage curtain valance and stage lighting along the bottom of the stage. I did add more black tulle for the stage curtains. Just added the black tulle tie a belly band to keep the card closed for presentation to Brooklyn. She is going to get the biggest kick out of this one!
Join us at Seems A Little Sketchy for sketch #17, enter the challenge and show us what you created!!!!
Love,
Wendy


Monday, June 25, 2012

Just For You!

Here is my second project for Sketch #16 as a design team member at Seems A Little Sketchy. I love how Jenn sketches - each one is unique and very fun to interpret.
This card showcases our sponsor Whoopsi Daisy. The image I chose is on Sheet 333. She was very fun to color up with Copics - still need more practice with fabric folds - this image is a great one for that technique. This card goes out to a special friend for her birthday.
The DP is Bo Bunny Alora Collection and an old stash B/W check from Making Memories. I love butterflies and flowers! The butterflies are Marianne Designs and the flowers are from Sweet n Sassy, and the Fancy Label from Sizzix, all cut with my favorite tool - my cuttlebug. The black rhinestones are from Queen & Co. All three ribbons are from my LSS, and the bow made with the mini Bowdabra.
My dear friend, KathyCan, cut/embossed the mat used on the front of the card and the sentiment mat on the inside, and sent me a stack of them - thank you so much, My Friend!
Come on over to Seems A Little Sketchy and get in on the fun, fun, fun with Sketch #16!
Thanks for stopping by today!
Love,
Wendy

Monday, June 11, 2012

Seems A Little Sketchy #15 - Congratulations

YAY! This is my first DT project for the awesome challenge blog "Seems A Little Sketchy". You know how I'm all into sketches, so to be chosen for the Seems A Little Sketchy design team is a great honor!
This is sketch #15 and was way fun for my project showcasing our wonderful sponsor Digi Doodle Shop image "Jr. Bride & Groom".
 As some of you know who follow my blog, my husband is a certified minister and I am a photographer. Together we make the perfect pair, especially for weddings! We were honored to attend to the Azam's in May, so this card will go to them, along with their flash drive with their wedding portraits.
I am embarrassed to say I cannot remember who did the wonderful technique that I CASE'D with the tulle in the Spellbinder's lacey oval and large oval cutout, placing the image on the inside of the card, but I sure do love the look - especially for a wedding card.
 The papers are from my hoarded stash of foof-a-la, along with Bazzil and Neenah CS. The pearls are double strung and perfect for a border, and twice useful when cut apart as singles. Also used my Memory Box "meadow leaf" die. The paper roses are from Paper Mart. 
Come on over to Seems A Little Sketchy and join us in our Sketch #15 Challenge, sponsored by Digi Doodle Shop!
Love,
Wendy
Challenges: The Ribbon Girl Blog-lace/ribbon; Just Some Lines-black/white; Speedy and Friends-B/W w/splash of color; Just Add Ink-pearls; 4 Crafty Chicks-monochromatic; CropStop-monochromatic; Paper Crafting journey-color it up; Oozak-two papers/embellies; Really Reasonable Ribbon-flowers/ribbon; Cooking it up with Katie-celebrate with ribbon and a die cut; Crafting for all Seasons-many layers; Crafty Creations Challenge-wedding/anniversary; Crafty Sentiments-white on white; Digital Tuesday Challenge-AG; Flourishes/Timeless Tuesday-wedding; Papertake Weekly-AG

Thursday, May 31, 2012

No black lines digi tutorial

So I've been seeing all of these lovely projects with no black lines stamping, using a very light-colored stamp ink. Since I mainly use digital stamps, I needed to figure out how to do this in my trusty Adobe PhotoShop. Oh, I muddled through (prob could have found something on the web ;), but determined to figure it out for myself. Since I use CS5, these are the steps I took to achieve the "look" of no black lines when using a digi stamp. Of course, you'll need to be able to print in color, so that's the first tip ;)
Here's what I did:
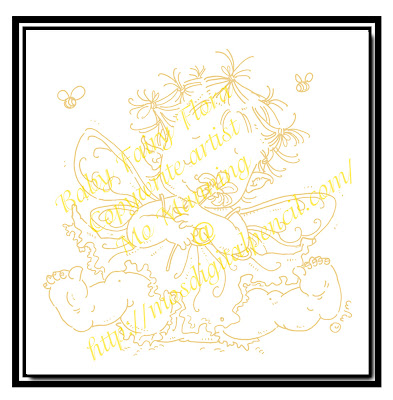
  •  Opened image in CS5 (sample shown is one of my fave Mo Manning images, Baby Fairy Flora, and can be found here)
  •  Top bar menu: image>mode> check RGB color, check 8 bits
  •  Top bar menu: window>check actions, layers, options, tools
  •  Under layers tab: right click "background layer", duplicate layer
  •  Under layers tab: you'll now see background layer and background copy
  •  Under layers tab: click on first background (the one with the lock) and delete
  •  Top bar menu: image>adjustments>hue/saturation, move lightness bar until you fade the image  nearly entirely, click okay
  •  Top bar menu: image>adjustments>photo filter (make sure preserve luminosity box is checked), click color, click on color box, click on color picker, click on color libraries, choose your color (I use Panatone solid coated) ex. 475c, click okay, move density bar to 100%
  • Top bar menu: image>adjustments>hue/saturation, move saturation bar to 50% and lightness to whatever saturation you would like to print.
Here are my results. Hope these steps work for you!
If you'd like to view the completed project with Baby Fairy Flora, you can find it here.
 Love,
Wendy

Wednesday, May 30, 2012

Thank You, Peggy!

Peggy and my birthdays are only two days apart and over the past 21 years, we have usually celebrated our "birthtweenday"; however, this year she was working and so we celebrated on my birthday. We hadn't gotten together in a couple of years (ya, know, that life thing...), but this year we spent 5 hours at one of our fave sushi places - sooooo much fun!!! She broke the rules and slipped a fun "inspiration" bracelet in my card, so this is my thank you to her.
Followed the sketch over at the Sweet Stop, which was perfect for my project.
Chose one of my fave Mo images, Baby Fairy Flora. Wanted to try my hand at "no black lines" and waded my way through the muck and mud in photoshop, but finally figured it all out. Love the outcome. You can find my "no black lines digi" mini-tutorial here
Used some fun DP by Prima with a blue and yellow theme. Also brought out two of my fave Memory Box dies - crisp bows and madera corner, but then really who am I kidding - all of my MBs are faves! LOL. Also added some crystal acrylic flowers, a little personalized tag/ticket, a bit of embossing and spellbinder cuts with the cuttlebug, organza ribbon and floss, and a little bit of stickles painted on her wings and edge of dress. Thank goodness I don't have to mail this one-with nearly 10 layers, it is quite heavy :)
Did up the inside a bit, too :)
Thanks for stopping by today!
Love,
Wendy