Friends of Happy Wen!

Sunday, October 14, 2012

Betwixed Brew

Now I must confess I am a BIG fan of Roberta Laliberte's art/Prairie Fairy Designs, and Gilly is one of my faves - this one being "Brewin' Spells"! It just wouldn't be Halloween if my kids and gkiddos didn't receive a card and a little somethin'-somethin' from me :) So... I made five of these. I'll show you the two different styles I did with the same image. The first one is a regular flat fold 6x6 card to go along with a bag of twix candy.
The second is a "Book" fold, to hold two twix bars to be mailed to my loved ones who do not have kiddos. The inside sentiment from me says "Betwixed Witches for a Happy Halloween". They will all get a kick out of this card and the accompanying treats :)
I used BasicGrey and Echo Park designer papers. Of course, colored with copics, adding Glossy Accents to glasses, frog eyes, and bubbles. Used my sissix dies for the matting, and sentiment/apothocary jars from a Free Digital Stamps link. I did change the wording on one of the bottles to read "love potion #9" in photoshop to make it more "family" friendly :) Again, a lot of layering and popping/3d on these cards
 
Betwixed Witches for a Happy Halloween to All!
Love, Wendy

Tutu Birthday Wishes!

Another Mo Manning image that I just couldn't resist "Prima". I did make two of this one, also, cuz the image is soooooo much fun to color with my copics and a dabble with the Spica glitter pen.
The papers are BoBunny "Smooch", and used my sweet-n-sassy hearts, run through the cuttlebug and embossed with the heart folder. Also used my spellbinders Heart circles, and a Memory Box flourish.
Alot of the elements are popped up, and then added a matted strip of the DP paper to the inside.
Wishing you a "Prima" Day!
Love, Wendy
Challenges: DP2 Challenge-B


Kickin' it up a year, Sis!

My sweet sister's birthday is this week, and she loves horses and has become quite the accomplished amateur competitor in the cutting horse arena. She also rides with the "painted ladies" in drill and parades. I love this Crissy Armstrong image "Gifted Horse" available at Whimsy Stamps.
Used BasicGrey Indian Summer paper that I've had stashed for a few years - love this paper. Magnolia fence, sizzix circles and flourishes, along with Spellbinders scalloped hearts, all cut and embossed with the cuttlebug. I colored with Copics and had a photo of her paint horse "Gunner", so was able to make the image a look-a-like of him = this will really put a smile on her face.
Dolled up the inside, and centered the large heart scallop for my handwritten message to her. The photos don't do all the layers and pop-up dimension justice - it is very much 3d.
Hope you're getting a kick outta your day!
Love, Wendy

Happy Twenty Fore!

This one is for my sweet son, Devan, for his 24th birthday. He is quite the golfer nowadays, and found this fun Three Stooges image that worked perfectly for his sentiment. The gift with the card is a boxed set of the Three Stooges series - he will get a big laugh out of this one :)
Wishing you an on par day!
Love, Wendy

Happy Birthday TuTu You

While relaxing with friends at our fave B&B, I made cards - traveling light nowadays :) I decided to make duplicates of all the cards, as suggested on the Basic Grey site :)
This sweet Mo Manning image "Odette" was irresistible to me. The papers are DoveCraft, heart string is from Memory Box, and used my sizzix circles and scallops all through the cuttlebug. Of course, colored up with my beloved Copics, along with a little touch of Spica.
Thanks for stopping by, and have a Tutu Beautiful Day!
Love, Wendy

Monday, July 9, 2012

Prima Ballarina, Brooklyn!

It's time for my DT project for Seems A Little Sketchy, Sketch 17! This time we are sponsored by AiFactory and I have chosen Ella the Ballerina. Sketch 17 is just perfect for my project!
This sweet little image just grabbed me and pulled me in so much, that I chose to use her six times!
My precious 4 year-old granddaughter, Brooklyn, has her first ballet recital this weekend and this card is perfect for the occasion. I wanted to simulate Brooklyn as the Prima Ballerina with her ballet troupe, all colored up with Copic markers.
I was chatting with my dear friend KathyCan and discussed the project with her, adding that I wanted to make it appear as a stage when you open the card. Well... Kathy had done a stage pop-up card back in November for her daughter, Allison's, birthday. Allison is a big Alice in Wonderland fan, so Kathy ran with that theme for her card - you must check out Kathy's wonderful project here. She turned me onto a fabulous tutorial by Kim (Paper Punch Addiction). Kim's tutorial worked perfectly for this project to put Brooklyn on stage in the spotlight!
Kathy sent me a birthday box full of My Mind's Eye 6x6 pads, and "indie chic" is perfect for Brooky's card. Used my new Memory Box "Elegant Scrollwork" to simulate "motion", which I found at Oozak. Wanted to give a feel for stage lighting, so used buttons, pearls and black tulle for the job on the card front. Inside wanted to use the star jewels/rhinestones, and the DP worked great to simulate the stage curtain valance and stage lighting along the bottom of the stage. I did add more black tulle for the stage curtains. Just added the black tulle tie a belly band to keep the card closed for presentation to Brooklyn. She is going to get the biggest kick out of this one!
Join us at Seems A Little Sketchy for sketch #17, enter the challenge and show us what you created!!!!
Love,
Wendy


Monday, June 25, 2012

Happy Birthday, Peggy!

I'm having such a great time being on the Seems A Little Sketchy Design Team. This project showcases Sketch #16, sponsored by Whoopsi Daisy.
The digi image is one of the fairies from Sheet 243 at Whoopsi Daisy - she is soooo cute! Decided to try my hand at "no black lines" with a digi. I plodded through on my own in PhotoShop (guess it would have been easier had i searched for a tutorial ;) With a wee bit of struggling, finally figured it out - and very much enjoyed the outcome; colored up with Copics.
The DP are from Prima's "songbird collection" 6x6 paper stack, which I found at Oozak (love Oozak - the most awesome customer service!). Used Sizzix oval dies, Martha Stewart butterfly trio punch and her butterfly cut/emboss punch, along with a new butterfly punch by Tonic, found on Blitsy. The fairy pewter charm I've had for eons, found on e-bay. Also used Fiskars flower punch, adding Glossy Accents to some of the butterflies and flowers, along with the little envies. The pearls are Kaiser "bliss".
Chalked the edges of the DP and large butterflies, added the lace trim and even braided three colors of floss for added dimension to the trim. Added a lot of Scotch 3m foam tape for lots of dimension of the layers. The sentiment actually has 3 layers of foam tape (I wish I could give credit to the sentiment artist-but no label on the file except for "fairy kisses star").
And... yuppers... it's an easel!
Thanks for popping by today.
Be sure to head on over to Seems A Little Sketchy to check out my teamies projects and join in the fun with Sketch #16!
Love,
Wendy
Challenges: Craft Your Passion-things with wings; Always Crafting-fairies; Paper Makeup Stamps-AG; Fashionista challenge #4-things with wings; Incy Wincy Designs Challenge-AG; Love to Create Challenge-AG; OLLCB-mystical magic; Paper Playtime-sentiment; Tammy's Scrapin Corner-AG/AA; Whoopsi Daisy-wings; Dream Valley Challenges-wings; Sentimental Sundays-cute and girly; Sketchy colors-green/orange/white; The Crafty Pad-more than 1 fold; 2 sisters challenge blog-AG; Allsorts-dies; Challenge up you life-no lines

Just For You!

Here is my second project for Sketch #16 as a design team member at Seems A Little Sketchy. I love how Jenn sketches - each one is unique and very fun to interpret.
This card showcases our sponsor Whoopsi Daisy. The image I chose is on Sheet 333. She was very fun to color up with Copics - still need more practice with fabric folds - this image is a great one for that technique. This card goes out to a special friend for her birthday.
The DP is Bo Bunny Alora Collection and an old stash B/W check from Making Memories. I love butterflies and flowers! The butterflies are Marianne Designs and the flowers are from Sweet n Sassy, and the Fancy Label from Sizzix, all cut with my favorite tool - my cuttlebug. The black rhinestones are from Queen & Co. All three ribbons are from my LSS, and the bow made with the mini Bowdabra.
My dear friend, KathyCan, cut/embossed the mat used on the front of the card and the sentiment mat on the inside, and sent me a stack of them - thank you so much, My Friend!
Come on over to Seems A Little Sketchy and get in on the fun, fun, fun with Sketch #16!
Thanks for stopping by today!
Love,
Wendy

Monday, June 11, 2012

Seems A Little Sketchy #15 - Congratulations

YAY! This is my first DT project for the awesome challenge blog "Seems A Little Sketchy". You know how I'm all into sketches, so to be chosen for the Seems A Little Sketchy design team is a great honor!
This is sketch #15 and was way fun for my project showcasing our wonderful sponsor Digi Doodle Shop image "Jr. Bride & Groom".
 As some of you know who follow my blog, my husband is a certified minister and I am a photographer. Together we make the perfect pair, especially for weddings! We were honored to attend to the Azam's in May, so this card will go to them, along with their flash drive with their wedding portraits.
I am embarrassed to say I cannot remember who did the wonderful technique that I CASE'D with the tulle in the Spellbinder's lacey oval and large oval cutout, placing the image on the inside of the card, but I sure do love the look - especially for a wedding card.
 The papers are from my hoarded stash of foof-a-la, along with Bazzil and Neenah CS. The pearls are double strung and perfect for a border, and twice useful when cut apart as singles. Also used my Memory Box "meadow leaf" die. The paper roses are from Paper Mart
Come on over to Seems A Little Sketchy and join us in our Sketch #15 Challenge, sponsored by Digi Doodle Shop!
Love,
Wendy
Challenges: The Ribbon Girl Blog-lace/ribbon; Just Some Lines-black/white; Speedy and Friends-B/W w/splash of color; Just Add Ink-pearls; 4 Crafty Chicks-monochromatic; CropStop-monochromatic; Paper Crafting journey-color it up; Oozak-two papers/embellies; Really Reasonable Ribbon-flowers/ribbon; Cooking it up with Katie-celebrate with ribbon and a die cut; Crafting for all Seasons-many layers; Crafty Creations Challenge-wedding/anniversary; Crafty Sentiments-white on white; Digital Tuesday Challenge-AG; Flourishes/Timeless Tuesday-wedding; Papertake Weekly-AG

Thursday, May 31, 2012

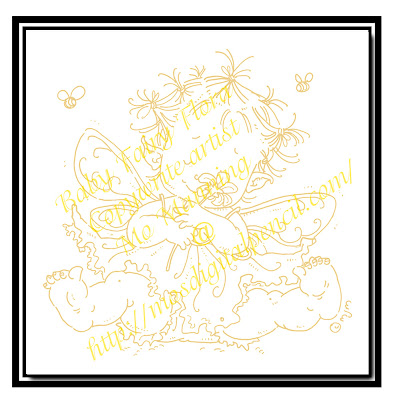
No black lines digi tutorial

So I've been seeing all of these lovely projects with no black lines stamping, using a very light-colored stamp ink. Since I mainly use digital stamps, I needed to figure out how to do this in my trusty Adobe PhotoShop. Oh, I muddled through (prob could have found something on the web ;), but determined to figure it out for myself. Since I use CS5, these are the steps I took to achieve the "look" of no black lines when using a digi stamp. Of course, you'll need to be able to print in color, so that's the first tip ;)
Here's what I did:
  •  Opened image in CS5 (sample shown is one of my fave Mo Manning images, Baby Fairy Flora, and can be found here)
  •  Top bar menu: image>mode> check RGB color, check 8 bits
  •  Top bar menu: window>check actions, layers, options, tools
  •  Under layers tab: right click "background layer", duplicate layer
  •  Under layers tab: you'll now see background layer and background copy
  •  Under layers tab: click on first background (the one with the lock) and delete
  •  Top bar menu: image>adjustments>hue/saturation, move lightness bar until you fade the image  nearly entirely, click okay
  •  Top bar menu: image>adjustments>photo filter (make sure preserve luminosity box is checked), click color, click on color box, click on color picker, click on color libraries, choose your color (I use Panatone solid coated) ex. 475c, click okay, move density bar to 100%
  • Top bar menu: image>adjustments>hue/saturation, move saturation bar to 50% and lightness to whatever saturation you would like to print.
Here are my results. Hope these steps work for you!
If you'd like to view the completed project with Baby Fairy Flora, you can find it here.
 Love,
Wendy